The VP320 and VP330 media players by Waves System are designed for flexible and reliable multimedia playback. In environments like multi-screen setups (museums, shopping malls, control rooms), it is critical for multiple players to start simultaneously to ensure perfect content synchronization.
This guide explains how to configure synchronized startup across multiple VP320/VP330 players using RS-232 (Daisy Chain) or TCP/IP protocols, along with best practices to avoid desynchronization.
Why Synchronize Multiple Players?
Synchronization is essential in the following scenarios:
Coordinated Display: Multiple screens must display the same content at the same time (e.g., advertisements, synchronized announcements).
Live Events: Simultaneous playback for presentations or shows.
Redundancy: Ensuring backup systems start at the same time as the primary system.
Without synchronization, even minor delays can negatively impact user experience or visual consistency.
Synchronization Methods
1. Synchronization via RS-232 (Daisy Chain)
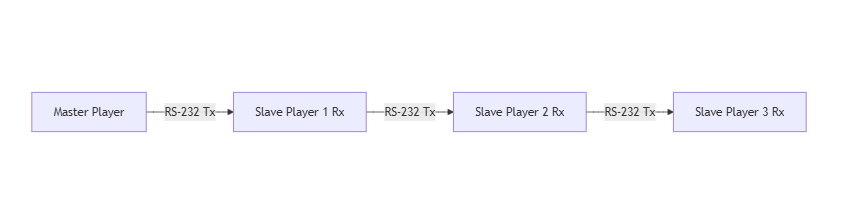
The Daisy Chain method allows multiple players to be connected in series via their RS-232 ports. Data received on the Rx input of a player is retransmitted identically on the Tx output to the next player. This allows chaining multiple players and transmitting playback commands in a synchronized manner.
Configuration Steps
Connect Players in Series:
Use an RS-232 cable to connect the Tx (OUT) port of the first player to the Rx (IN) port of the second player.
Repeat for additional players (up to the hardware limit of the protocol).
Note: Ensure communication settings (baud rate, data bits, etc.) are identical on all players.
Enable Daisy Chain Mode:
In the Advanced Configuration menu of the player, enable "Daisy Chain Mode" to allow data retransmission.
Send a Playback Command:
The master player sends a playback command (e.g., play a folder or file).
Thanks to Daisy Chain mode, this command is automatically retransmitted to all slave players connected in series.
Verify Synchronization:
Run a test with a short content (e.g., 10-second video) to confirm all players start simultaneously.
⚠️ Warning: If many players are connected this way, a slight delay may occur at the end of the chain.
Example Wiring Diagram
2. Synchronization via TCP/IP
For networked installations, the TCP/IP protocol offers a more flexible and scalable synchronization method. Unlike RS-232, synchronization via TCP/IP relies on tags in file names rather than direct commands.
Configuration Steps
Connect Players to the Network:
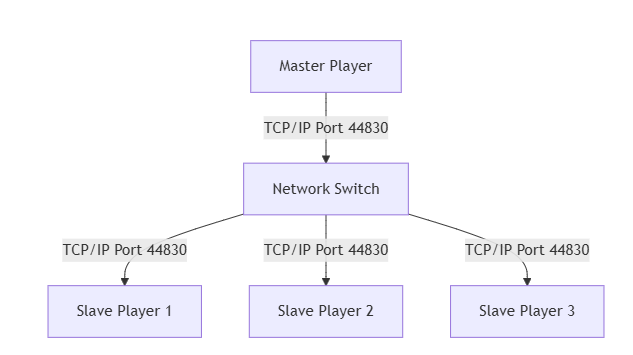
Ensure all players are connected to the same local network (Ethernet recommended).
Configure a fixed IP address for each player (or a DHCP reservation via MAC address).
Example of static configuration:Player 1:
192.168.0.1Player 2:
192.168.0.2Gateway:
192.168.0.254Subnet Mask:
255.255.255.0
Configure the Synchronization Port:
The default port for synchronization is 44830 (configurable in Scenario Settings > Synchronization of Playback Start).
All players in the same group must use the same port number.
Configure the Master Player:
Create folders as for normal playback.
Add the
[SYNCHROxxx]tag to files that should trigger synchronization (e.g.,Lion1 [SYNCHRO001].mp4).How it works: When a file with this tag is played, the master player sends a playback command to the slaves.
Configure Slave Players:
Create a
synchrofolder at the root of the storage medium.Place the files to be played there, numbered (e.g.,
001 lion2.mp4,002 chien2.mov).How it works: When a synchronization command is received, the slave player plays the corresponding file in the
synchrofolder.
Test Synchronization:
Start playback on the master player: slaves will automatically start the corresponding file.
Use a network monitoring tool (e.g., Wireshark) to verify commands are received.
Example Network Topology
Best Practices
1. Minimize Latency
Use short cables for RS-232 connections (max 15 meters to avoid signal loss).
Prefer wired networks (Ethernet) over Wi-Fi for TCP/IP, as they are more stable.
Avoid slow hubs/routers: Use gigabit switches to reduce latency.
2. Hardware Synchronization
External Relays: For ultra-precise synchronization, use an external relay controlled by the master player to simultaneously trigger power to all players.
Time Signal: Use an NTP server to synchronize the internal clocks of the players (useful for scheduled programming).
3. Pre-Startup Checks
Identical Content: Ensure all players have the same files in the same folders (e.g.,
000,001).Updated Firmware: Verify all players are running the same firmware version to avoid incompatibilities.
Real-World Testing: Perform a test with the final content and final configuration before deployment.
Common Issues and Solutions
Issue | Possible Cause | Solution |
|---|---|---|
Desynchronization after a few minutes | Network or RS-232 latency | Shorten cable lengths or switch to TCP/IP. |
One player does not start | Incorrect IP address or RS-232 ID | Verify network or Daisy Chain configuration. |
Commands not received | Blocked communication port | Check firewalls or port settings (default: 44830). |
Different content between players | Missing or misnamed files | Manually synchronize storage devices. |
Delay at the end of RS-232 chain | Too many players in series | Limit the number of players or use TCP/IP. |
For further reading:
Advanced Control: RS-232/TCP-IP
Scheduled Programming
Was this article helpful?
That’s Great!
Thank you for your feedback
Sorry! We couldn't be helpful
Thank you for your feedback
Feedback sent
We appreciate your effort and will try to fix the article