The VP320 and VP330 media players by Waves System allow you to automatically schedule the playback of multimedia content at specific dates and times. This feature, called Scheduler, is ideal for professional environments such as museums, shopping malls, or control rooms, where it is necessary to play specific content at defined times (e.g., opening/closing announcements, time-based promotional videos).
This guide explains how to configure and use scheduled programming on your players using the scheduler.tm2 file, the Scheduler software provided by Waves System, and all available commands for full control.
Why Use Scheduled Programming?
Scheduled programming offers several advantages:
Automation: No need for manual intervention to start or stop content.
Precision: Actions are triggered to the minute, based on the player's internal clock.
Flexibility: Adapt to opening hours, special events, or temporary campaigns.
Extended Control: Manage not only players but also displays (HDMI-CEC) and projectors (PJLINK).
How Scheduled Programming Works
General Principle
The system relies on three key elements:
Scheduler Software: Dedicated tool for creating and editing programming files (available at www.waves-system.com, Software Support section).
scheduler.tm2File: File generated by the Scheduler software, containing all scheduled actions.Player's Internal Clock: Must be synchronized (via NTP or manually) for precise execution.
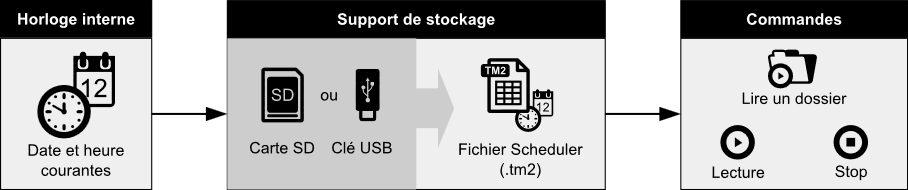
Structure of the Scheduler File
The scheduled programming file is organized as follows:
A calendar: Covers the period from January 1, 2016, to December 31, 2037.
Each date in the calendar can be associated with a "typical day" (or left empty if no action is planned).
"Typical Days": Describe the progression of a day minute by minute (from 00:00 to 23:59).
A typical day consists of events (actions to be executed at a specific time).
Example: An event can trigger the playback of a folder at 9:00 AM, then put the player in standby at 6:00 PM.
Scheduler Capabilities
Create multiple different typical days (e.g., one for weekdays, one for weekends).
One event per minute: Each minute can trigger a unique action.
Precision: Events are executed at the minute change (e.g., an action scheduled at 2:30 PM will be executed at 2:30:00 PM).
Available Commands for Events
Events in a typical day can trigger the following commands:
Playback Commands
PLAY FOLDER: Play a specific folder.Details: This command starts playback of one of 1000 possible folders (numbered from 000 to 999). The folder number is determined by the first 3 characters of its name (e.g.,
001,250).Playback Modes: Options like loop (
[Jxxx]), random ([RND]), or sequential ([SEQ]) depend on the rest of the folder name (e.g.,001[J001]for a loop).Example:
PLAY FOLDER 001starts playback of folder001.
PLAY: Restart playback.Details: Restarts playback of the current folder. If no folder playback has preceded this command (or if the player stopped after the end of a folder), the command will be ignored.
STOP: Stop playback.Details: Stops playback in the current folder.
Power Management Commands
STANDBY: Put the player in standby mode.WAKE UP: Wake up the player.
HDMI-CEC Commands (Display Control)
HDMI-CEC STANDBY: Turn off a display device via the HDMI-CEC protocol.HDMI-CEC WAKE UP: Turn on a display device via the HDMI-CEC protocol.
PJLINK Commands (Projector Control)
VIDEO PROJECTOR (PJLINK) POWER ON: Turn on a projector via the PJLINK protocol.VIDEO PROJECTOR (PJLINK) POWER OFF: Turn off a projector via the PJLINK protocol.
Note: Only one command can be executed per event. For complex actions, create multiple events.
Configuration Steps
1. Prerequisites
Download the Scheduler software from www.waves-system.com (Software Support section).
Read the user manual for the Scheduler software to understand its features.
Check compatibility: The
scheduler.tm2file is compatible with VP320 and VP330 players (firmware V1.13.1 or higher).
2. Create a Programming File
Launch the Scheduler software and create a new project.
Define the calendar:
Select the dates for which actions are needed.
Associate each date with a "typical day" (or create new ones).
Configure typical days:
For each typical day, add events with the desired commands (e.g.,
PLAY FOLDER 001at 9:00 AM,STANDBYat 6:00 PM).Example:
09:00:
PLAY FOLDER 001(welcome video).12:00:
HDMI-CEC WAKE UP(turn on the display for a message).18:00:
STANDBY(put the player in standby).
Export the file:
Save the file as
scheduler.tm2(the name must not be changed).
3. Transfer the File to the Player
Copy the
scheduler.tm2file to theSYSTEMfolder on the player's SD card or USB drive.Path:
/SYSTEM/scheduler.tm2
Insert the storage medium into the player and restart if necessary.
4. Synchronize the Player's Clock
For precise execution of scheduled actions, the player's internal clock must be synchronized:
Via NTP (recommended):
Enable NTP synchronization in the player's network settings.
Note: To use manual time update commands, temporarily disable NTP.
Manually:
Use RS-232/TCP-IP commands to update the time and date (see the Communication Protocol section of the user guides).
Concrete Example
Scenario: Museum Opening and Closing with Full Management
Goal: Play a welcome video at opening (9:00 AM), turn on a projector for a presentation at 2:00 PM, and turn everything off at closing (6:00 PM).
Configuration in Scheduler Software
Create a "Opening Day" typical day:
09:00:
PLAY FOLDER 001(welcome video in folder001[SEQ]for sequential playback).14:00:
VIDEO PROJECTOR (PJLINK) POWER ON+PLAY FOLDER 002(afternoon presentation).18:00:
STOP+VIDEO PROJECTOR (PJLINK) POWER OFF+STANDBY.
Associate this typical day with all the museum's opening dates in the calendar.
Export the file as
scheduler.tm2.Copy the file to
/SYSTEM/scheduler.tm2on the player's storage medium.
Best Practices
1. Clock Synchronization
Enable NTP for automatic synchronization with a time server.
Regularly check the player's time, especially if NTP is disabled.
2. File Management
Do not rename the
scheduler.tm2file: the player will not recognize it.Backup a copy of the file on your computer for future updates.
3. Folder Naming
For
PLAY FOLDER, use 3-digit folder names (e.g.,001,250) to avoid errors.Add tags (
[Jxxx],[RND],[SEQ]) if needed to control playback mode.
4. Testing
Test in real conditions: Verify that actions are triggered at the correct times.
Use nearby dates for testing (e.g., schedule an event in 5 minutes).
5. Updates
To modify the programming, re-export the
scheduler.tm2file and copy it back to theSYSTEMfolder.
Common Issues and Solutions
Issue | Possible Cause | Solution |
|---|---|---|
Actions not triggering at the scheduled time | Player clock out of sync | Synchronize the clock via NTP or manually. |
| Incorrect file name or wrong folder | Ensure the file is named |
| Incorrect folder number or missing tags | Verify that the folder exists, is named with 3 digits, and tags are correct. |
| Player already in standby or awake | Check the current state of the player. |
HDMI-CEC/PJLINK commands not executed | External device not compatible | Verify the compatibility of the display or projector with HDMI-CEC/PJLINK. |
Compatibility issue | Outdated firmware version | Update the player's firmware. |
Was this article helpful?
That’s Great!
Thank you for your feedback
Sorry! We couldn't be helpful
Thank you for your feedback
Feedback sent
We appreciate your effort and will try to fix the article