The following sections provide an overview of the Scheduler software workspace.
TABLE DES MATIÈRES
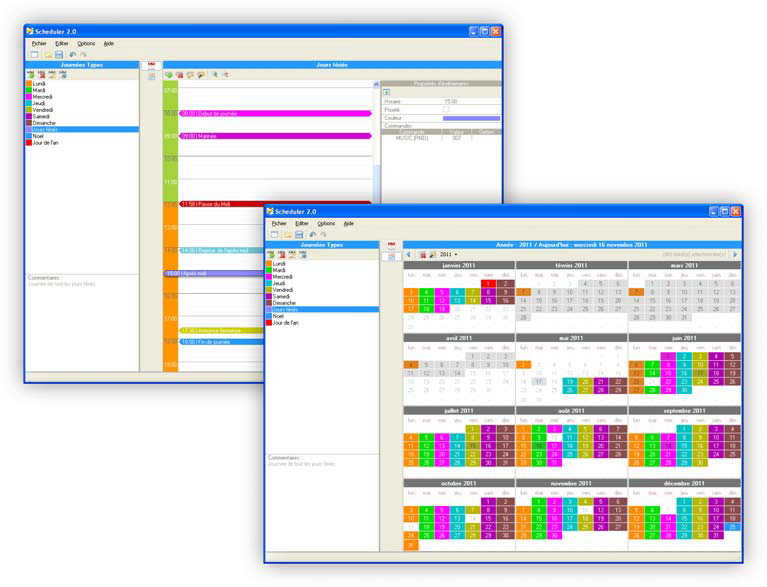
The Scheduler workspace consists of three main areas:
The other parts of the interface are the tools and features used to create or work on a project. You can resize the list of typical days, the "Edit a typical day" view, and the "Edit calendar" view by dragging the separator lines between them.
Global Toolbars
Main Toolbar
The toolbar provides quick access to frequently used functions in the Scheduler software.

 Create a new project (Ctrl+N) : Opens a new project. Before opening a new project, you will be prompted to save any changes made to the current project.
 Open a project file (Ctrl+O) : Displays the "Open" dialog box. This dialog box allows you to browse all drives to select a Scheduler project.
 Save the project (Ctrl+S) : Saves changes made to the selected project. When saving a project for the first time, the "Save Project As" dialog box appears.
 Undo (Ctrl+Z) : Undoes the last action. Scheduler supports an unlimited number of undos, allowing you to restore the project to any state since the most recent save.
 Redo (Ctrl+Y) : Reverses the undo.
Central Toolbar
The central toolbar allows you to quickly switch between the "Edit a typical day" view and the "Edit calendar" view.
 Show the "Edit a typical day" mode (Alt+1) : Displays the editing of a typical day selected from the list of typical days in the center of the interface. Allows you to edit the events of a typical day.
 Show the "Edit calendar" mode (Alt+2) : Displays the calendar editing in the center of the interface. Allows you to insert instances of a typical day into the calendar.
The list of typical days
Displays the list of typical days in the project in the order they were created. Typical days are visualized in the list using their name and display color.
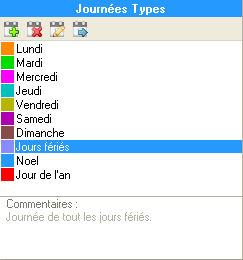
This area allows you to:
- Select a typical day from the list to perform modification, event editing, calendar insertion, or deletion operations.
- Perform drag-and-drop operations of a typical day from the list to a specific date or a selection of dates made on the calendar.
"Comments of the Selected Typical Day" Area
Displays the "Comments" information associated with the typical day.
Note: Projects intended for the Event Player do not have this option.
Typical Days List Toolbar
The toolbar provides quick access to frequently used functions for creating, editing, and deleting typical days in your project.

 Add a typical day (Ctrl+T) : Creates and adds a new typical day to the project. Displays the "New Typical Day" dialog box, where you will be prompted to define the name of the day, its display color, and additional user information.
 Delete the selected typical day (Ctrl+Del) : Deletes a typical day from the list of typical days. This operation deletes all instances of the typical day present in the calendar, as well as all events placed in the typical day.
 Edit the selected typical day (Ctrl+Shift+T) : Opens the "Edit Typical Day" dialog box. Allows you to modify the name of the day, its display color, and additional user information for an already created typical day.
 Add the selected typical day to the calendar (Ctrl+Alt+T) : Places an instance of the selected typical day on all previously selected dates in the calendar.
The "Edit a typical day" view
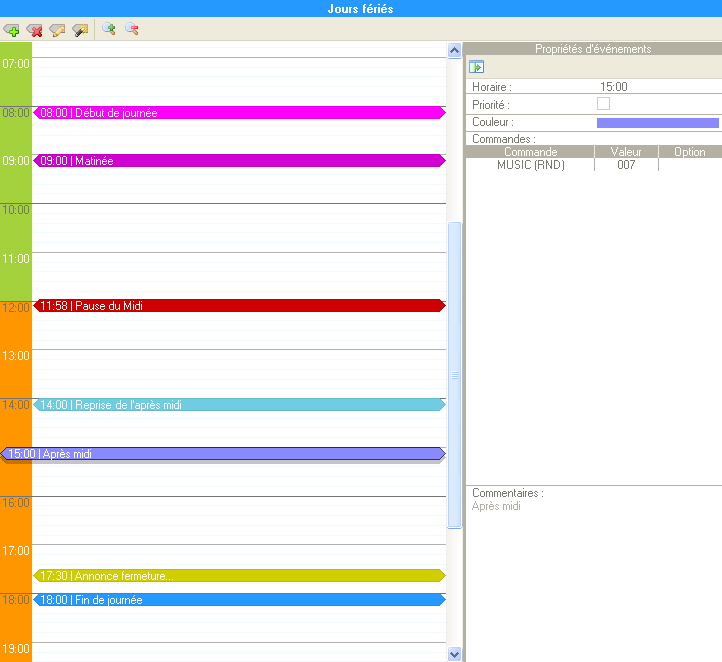
This section contains all the events performed in a typical day selected from the "list of typical days". This section allows you to perform common management operations for the events of a single typical day, minute by minute.
"Daily Time Grid" Area
Displays all the events of a single typical day on a 24-hour time grid. Events are visualized on the time grid using their trigger time, display color, and user comments entered.
This area allows you to select an event to perform modification, event editing, deletion, or repetition operations.
"Event Properties" Area
This area displays a quick and comprehensive overview of the options, parameters, and actions of an event selected in the time grid. It also allows you to view the comments associated with the event.
This area can be hidden.
Typical Day Editing Toolbar
The toolbar provides quick access to frequently used functions for creating, editing, deleting, repeating, and adjusting the display of events in a typical day.

 Add a new event (Ctrl+E) : Creates and adds a new event to the selected typical day. Displays the "Add/Edit Event" dialog box, where you will be prompted to define the event's trigger time, its trigger options, its display color, the list of actions it performs, and additional user information.
 Delete the selected event (Del) : Deletes the selected event from the typical day.
 Edit the selected event (Ctrl+Shift+E) : Opens the "Add/Edit Event" dialog box. Allows you to modify the event's trigger time, its trigger options, its display color, the list of actions it performs, and additional user information for an already created event.
 Repeat the selected event (Ctrl+Alt+E) : Opens the "Repeat an Event" dialog box. Creates repeated copies of the selected event based on the repetition criteria defined in the dialog box: you can define how many minutes and hours the event is repeated, until which time the event is repeated, and whether existing events at the same times as those created by the repetition operation are replaced or not.
 Zoom In (Ctrl+) : Zooms in on the display of the time grid where events are visualized.
 Zoom Out (Ctrl-) : Zooms out on the display of the time grid where events are visualized.
The "Edit calendar" view
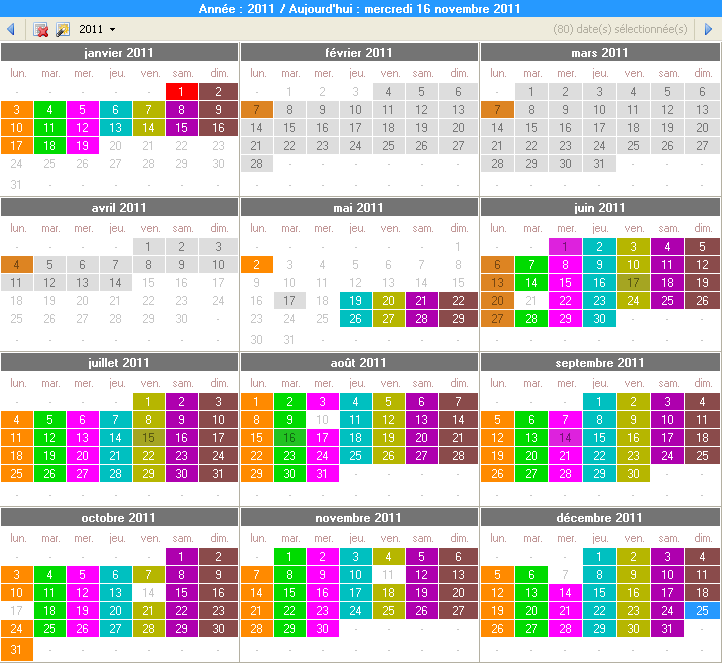
This section contains all the instances of typical days performed during a range of years from 2000 to 2099. This section allows you to perform common management operations for typical days called by the calendar, day by day.
"Annual Calendar" Area
Displays all dates, days, and months of a given year, as well as all instances of typical days placed on the calendar. Typical days placed on the calendar appear by coloring the date box using the color of the typical day you previously defined.
Uncolored dates are empty of any typical day instance. Only one instance of a typical day can be placed on a date. If a date is selected, it appears in gray.
This area allows you to perform drag-and-drop operations of a typical day, from the list of typical days, to a specific date or a selection of dates made on the calendar.
Many multiple selection operations can be performed on the calendar:
- Select a specific date by clicking on the date number.
- Select all days of a week by clicking on the label of the desired day of the week (Monday, Tuesday, Wednesday, Thursday, Friday, Saturday, Sunday).
- Select a full month by clicking on the label of the desired month of the year (January, February, March, April, May, June, July, August, September, October, November, December).
- Select multiple consecutive dates by holding down the Shift key on your keyboard while performing one of the previously described selections.
- Select multiple discontinuous dates by holding down the Ctrl key on your keyboard while performing one of the previously described selections.
Calendar Toolbar
The toolbar provides quick access to frequently used functions for deleting and repeating instances of typical days for each date and each year in the calendar.

 Previous Year (left arrow) : Allows you to select the previous year displayed in the annual calendar display area.
 Delete selected date(s) (Del) : Deletes all instances of typical days from the selected dates in the annual calendar display area.
 Date Selection/Deletion/Add Tool (Ctrl+Alt+D) : Opens the "Date Selection/Deletion/Add" dialog box. This tool allows you to precisely make multiple date selections or add and delete typical days using various repetition criteria and range delimitations.
 Currently displayed year in the annual calendar display area : Opens a dropdown menu to select the currently displayed year. Allows you to precisely select a year between 2000 and 2099.
 Next Year (right arrow) : Allows you to select the next year displayed in the annual calendar display area.
Was this article helpful?
That’s Great!
Thank you for your feedback
Sorry! We couldn't be helpful
Thank you for your feedback
Feedback sent
We appreciate your effort and will try to fix the article