The "Edit a Typical Day" section allows you to add events to the typical day selected from the list of typical days.
- Start by selecting the "Edit a Typical Day" view, click Show the "Edit a Typical Day" mode (Alt+1).
- Select a typical day from the list of typical days to associate the "Edit a Typical Day" view with the selected typical day.
Notes: Events are represented in chronological order on a 24-hour time grid. An event can be placed every minute, i.e., a maximum of 1440 events per typical day. Two events cannot be placed at the same minute in the same typical day.
Adding an Event
There are two methods to add an event to the time grid.
Method 1 - Using the "Add a New Event" Command:
- In the "Edit a Typical Day" section, click the Add a New Event (Ctrl+E) button. The "Add/Edit Event" dialog box appears.
Method 2 - By Double-Clicking on the Time Grid:
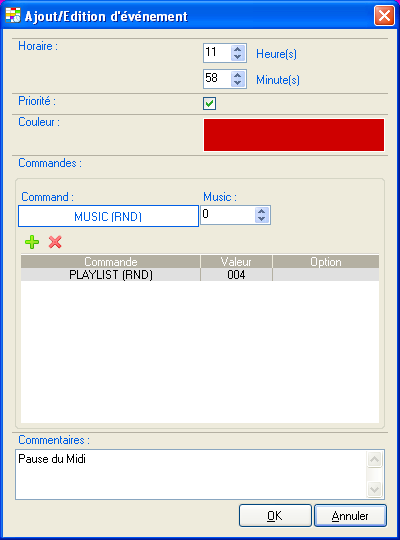
Once the dialog box is open:
- Select the hour and minute for the event's trigger time in the typical day using the Hour(s) and Minute(s) fields.
- Activate the Priority checkbox if you want the event to be triggered immediately. Do not activate this checkbox if you want the currently playing piece to finish before triggering the event.
Note: Projects intended for the Event Player do not have this option.
- Click on the colored panel. The "Colors" dialog box appears. Define a display color specific to your event, then click OK.
Note: Projects intended for the Event Player do not have this option.
- Click on the panel displaying the currently designated command; a list of commands compatible with your player appears.
- Select the desired command from the list. Any available parameter options for the command appear to the right of the command selection panel.
Notes: The list of available commands depends on the type of player you selected when creating the project. Commands can have zero to two parameters. The display and formatting of command parameters depend on each command.
- If command parameters are available, select the desired parameter values.
- Click the Add the Command to the List button. The command is added to the command list.
Note: Projects intended for the Event Player only allow one command per event.
- Repeat the process to add new commands to the command list.
Note: The number of commands depends on the type of player you selected when creating the project.
- In the event’s command list, you can select a command to edit or delete it, and move a command up or down to change its order. When you select a command, its editable parameters are updated with that command’s parameters.
- Type the identifying and descriptive information for your event in the Comments field.
- Click OK.
Deleting an Event in a Typical Day
- Select an event in the time grid of the "Edit a Typical Day" section; the event will then appear highlighted.
- Click the Delete the Selected Event (Del) button.
Editing an Event in a Typical Day
There are two methods to modify an event on the time grid.
Method 1 - Using the "Edit the Selected Event" Command:
- Select an event in the time grid of the "Edit a Typical Day" section; the event will then appear highlighted.
- Click the Edit the Selected Event (Ctrl+Shift+E) button. The "Add/Edit Event" dialog box appears.
- Modify the fields you wish to redefine.
- Click OK.
Method 2 - By Double-Clicking on the Chosen Event:
- Double-click on the chosen event in the time grid; the "Add/Edit Event" dialog box appears.
- Modify the fields you wish to redefine.
- Click OK.
Repeating an Event in a Typical Day
This operation allows you to create multiple copies of the same event at regular intervals up to a certain time.
- Select an event in the time grid of the "Edit a Typical Day" section; the event will then appear highlighted.
- Click the Repeat the Selected Event (Ctrl+Alt+E) button. The "Repeat an Event" dialog box appears.
- Select the repetition interval for the event using the HH (hours) and MM (minutes) fields in the Every section.
- Select the time limit until which the event repetition should occur using the HH (hours) and MM (minutes) fields in the Until section.
Note: The time limit must be later than the trigger time of the event to be repeated.
- Activate the Delete Existing Events at the Same Times checkbox if you wish to replace existing events at the same repetition times. Do not activate this checkbox if you do not wish to replace existing events at the same repetition times.
- Click OK.
Was this article helpful?
That’s Great!
Thank you for your feedback
Sorry! We couldn't be helpful
Thank you for your feedback
Feedback sent
We appreciate your effort and will try to fix the article